Tutorials
|
Stirling VFX
April 18, 2025
Created and written by Pierre Bournigault. Edited by Leif Pedersen.
As a 3D artist, expanding your skill set is an ongoing journey. I wanted to make the most of my free time by exploring an area I had never tackled before: live-action VFX. To challenge myself, I went outside and recorded a plate using my phone, ensuring I had to work with organic, unpredictable camera movement. Additionally, I rented a Theta 360° camera to learn how to capture my own HDRIs and integrate them into my workflow.
In this tutorial, I'll be compositing a slightly modified version of RenderMan’s Stirling model into a parking spot. Let’s dive in and explore this process together!
Before moving forward, we need to ensure that our scene is properly set up. You can enable ACES settings within the Render Settings of your scene. If RenderMan is correctly installed, it should automatically fetch the OCIO config file from the RenderMan installation directory, also referred to as RMANTREE in environment variable terms.
Additionally, make sure that the IT viewer is also displaying in ACES by checking its Preferences window. This will ensure color accuracy throughout your workflow. Out of all the OCIO color profiles, the right color profile for most CG work will be acesCG.

Color Management in RenderMan for Maya
Since this is an outdoor scene lit by the sun, we’ll use distant lights, as they are best suited for evenly illuminating large environments and providing parallel shadows, like the sun. However, working with the HDRI required a bit more trial and error.
To capture a high-quality High Dynamic Range Image (HDRI), ensure your camera is set to a multi-exposure mode. The more exposure levels you capture, especially at the extreme ends of brightness and darkness, the better the final result will be. In my case, I took 12 different exposures, pushing the shutter settings to their limits to achieve the widest possible dynamic range.

Here are the darkest and brightest settings I used for this shoot. As you can see, at this stage, it’s not about aesthetics—the goal is to capture the full range of light and shadow to achieve more realistic, high-contrast reflections.
Once you've captured all your images, you can easily merge them using software like Photoshop. Just be sure to export the final image in a 32-bit format, such as .exr, to preserve the full dynamic range and avoid any loss of detail.
Now we have a high-quality HDRI that perfectly matches the location where our car will be placed in the footage. However, as you can see, there are still some imperfections, such as lens flares, distortion, and the tripod being visible. Since these artifacts can introduce unpredictable effects on our reflections, we’ll need to clean them up.


Before and after HDRI cleanup
In the cleaned-up version. We primarily removed the lens flare, the tripod and its shadow, as well as the white car. Since the car was positioned very close to the camera during the shoot, lens distortion made it appear much larger than it should in the 3D scene. Instead, we’ll use a plane for reflections to ensure a more accurate and controlled result. Don’t be afraid to photoshop roughly things as the most important thing is to ensure smooth reflections.
Before we move on to what might be the most technical part of this tutorial, I want to emphasize the importance of proper layering. If done carelessly, it can quickly turn into a headache. I highly recommend taking the time to explore the dedicated docs pages on Holdouts, Layering, and Trace Sets.
In this scene, we have two types of objects: reflected objects and reflectors (which act as holdouts). First, let’s take a look at how the layering for the reflected objects was set up.

Splitting objects through layering generally will make your life easier down the line
For the car itself (left image), the setup is fairly straightforward: I made everything except the car directly and indirectly invisible to the camera. However, you’ll notice that I chose to hide the glass windows.
Glass can be tricky to handle when aiming for accurate refractions in your integration. To simplify the process, I placed it on a separate layer, as shown in the right image. The approach I used here was to retrieve the selection of visible elements from my first layer (which includes the entire car but excludes its windows and interior) and create a Matte Object collection. This setup ensures that I can seamlessly composite the glass back into the scene in Nuke, avoiding any intersection issues.

You can add image sequences to your textures by using the frame padding <f5> expression. The number should be equivalent to your file padding <f5> for img_00001 or <f3> for img_001 etc…
For the refractions, I created a plane with a PxrConstant shader and constrained it to the camera. Within this PxrConstant, I simply connected the image sequence of the base plate and offset it far enough to always remain behind the car.
This setup allows me to seamlessly merge the windows back onto the car while ensuring proper refractions. Without this adjustment, the distorted background from the HDRI would have been a major distraction.
Now let’s move on to the layering of the car reflectors.
Using absolute overrides in the Render settings for each layer are a powerful tool, here increasing drastically the minimum samples for this reflection, will help me having a cleaner output without increasing render times on the other layers.
We’ll be using the layer with the van that appears at the beginning of the video, as it provides the most complete example. However, all the reflector layers are set up in a similar way.
First, we’ll create a Holdout override (feel free to check the dedicated page for Holdouts) for the van, which has been quickly shaded to match the look shown in the footage. Everything outside of our main object (the van) will again be made directly invisible to the camera. However, this time, the focus will be on indirect visibility. This is where trace sets will really work their magic for us.

In our footage, we can see that the car and its reflection should be receiving a shadow on its right side, cast by the black car. However, to keep our objects separate for cleaner and more manageable compositing, we disable indirect visibility for the black car proxy. As a result, the shadow it casts on our car disappears, breaking the realism of the reflection.
This is where trace sets come in, allowing us to get the best of both worlds.
To create a trace set, refer to the Creating Trace Sets in Maya documentation. In this case, I simply created a set containing all the objects I didn’t want reflected in my holdout and excluded them from the van’s trace sets.

Glad to see you’ve made it this far! Now, repeat this process for as many layers as your project requires, and you’re finally ready to dive into rendering settings.
Now that our layering has been set up, there are only a few things left to consider in the rendering settings. Since we’re working with plate matching, motion blur is an essential factor to keep in mind.
Take the time to examine your footage and evaluate how sharp the images are. Even if your frames appear clean and crisp, always run test renders to ensure that your motion blur matches the one in your plate.
I highly recommend adding at least a slight amount of motion blur, as it helps create smoother interpolations between frames, enhancing overall believability and realism. The amount of motion blur depends on your footage, so make sure you adjust it to match.
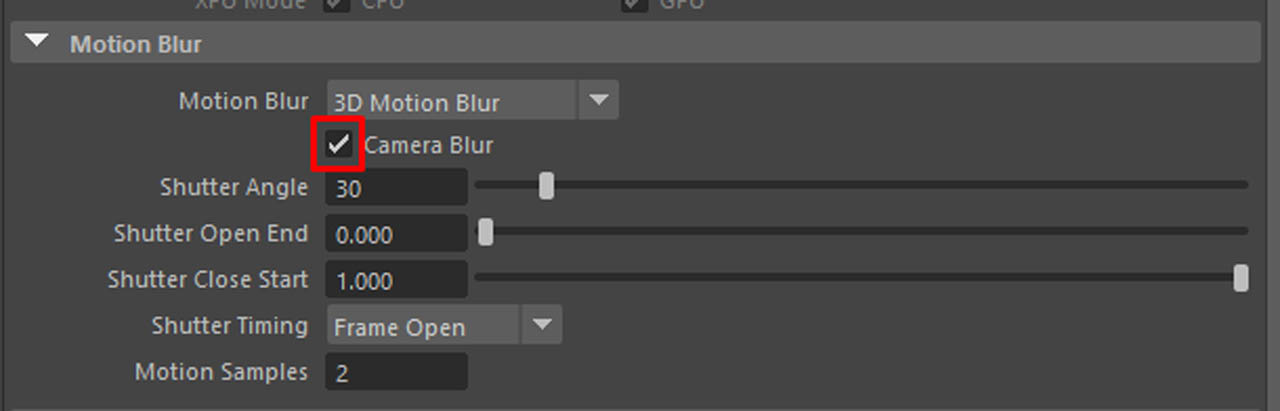
In this case, since only the camera is moving, we need to ensure that motion blur is properly applied. To do this, make sure to enable "Camera Blur", allowing the render engine to account for the camera’s movement and generate accurate motion blur.
Before moving on to compositing, I’d also recommend you to take the time to render an Occlusion pass and Cryptomattes. This will make you gain a lot of time in compositing, saving you from many hours of tedious rotoscopy. Feel free to read the documentation on how to set up Cryptomattes.

My final rendering tip is about some useful overrides (yes, layer overrides again!). While working with LPE (Light Path Expression) render passes can be incredibly powerful, in our case, rendering them for all layers isn’t necessary. Since the reflectors are primarily composed of specular surfaces, there’s little to no value in generating hundreds of storage-intensive EXR files.

To optimize your workflow, you can limit certain layers to rendering only the beauty pass by deactivating the LPE display. Just be sure to double-check that you're adjusting the render settings for the correct layer every time—you don’t want any unpleasant surprises when reviewing your renders at the office on Monday morning!
That was quite a journey, but we’ve finally reached the last step of our integration : compositing!
First, we’ll ensure that our ACES workflow remains consistent in Nuke as well. No worries—this only takes a few clicks and Nuke will convert the sRGB footage into proper acesCG color space for us.

To access your project settings in Nuke, hover your mouse over the Node Graph window and press "S". Navigate to the Color tab and switch the "Nuke Default" setting to "OCIO". This ensures that Nuke automatically opens all your files in the correct color space.
Now, feel free to download the project file, where I’ve added plenty of sticky notes explaining the entire compositing process node by node.
One useful Nuke workflow tip that helped me avoid draining and time-consuming rotoscoping is the use of 3D cards to generate additional masks. Here’s how the setup works:

When writing your image sequence of the generated mask, make sure your .png will be generated with an alpha for better results.

This basic 3D scene setup, combined with a dual-viewer workspace, allows you to draw “directly” on flat, non-moving surfaces—such as the ground. By creating a single rotoscope shape and using the camera tracking data, you ensure that the rotoscope remains stable throughout the shot, saving you a significant amount of time and effort.
In this case, I used this technique to generate an occlusion mask for the shadow our car will cast in this part of the footage.
However, if you find yourself with no other option but to tackle the dreaded task of manual rotoscoping, arm yourself with patience, determination—and perhaps a good podcast to keep you company.

When it comes to rotoscoping, my best advice is to keep your shapes as simple as possible. It’s much easier to work with 20 smaller shapes made of 6 points each than to struggle with a single, overly complex shape that will likely drive you insane by the end of the day. So, don’t hesitate to break down your object into multiple shapes for better control and efficiency.
Another useful trick is adjusting the "Life" input for each shape. This allows you to deactivate a shape once it’s no longer needed, preventing unnecessary shapes from awkwardly floating across your screen.

Additionally, fewer keyframes mean fewer problems. To save time, start with a rough pass by setting a keyframe every 5 to 10 frames (you can use Shift + arrow keys to jump by a set number of frames). This will help you quickly identify which frames require the most refinement.
Finally, while Bezier curves are the go-to tool for rotoscoping, I highly recommend experimenting with B-spline shapes. They often require fewer control points, making them easier to fine-tune and stabilize, especially when working with organic motion.

Feel free to explore the provided Nuke scene to get a deeper understanding of the entire process. You’ll find sticky notes explaining the node by node process.
However, if I had to summarize the key things to watch out for when working on plate matching, based on my own experience:
At the end of the day, the goal is to seamlessly blend CGI into live-action while avoiding anything that might trigger visual suspicion.
I personally see this as a very unforgiving, but creatively exciting exercise—because even the most inexperienced viewer can instantly tell when something feels off. Our eyes have been naturally trained to observe the world around us for an entire lifetime, making any inconsistency in the integration immediately noticeable.
Have fun with the project!
Pierre Bournigault is an artist and co-director of L'Ogre du Danube. He’s currently looking for an opportunity to jump start his career in visual effects and feature animation.
This project is available with a Attribution-NonCommercial 4.0 International License. This allows you to share and redistribute for non-commercial purposes, as long as you credit the original authors.